- You have extensive understanding of Kubernetes
- Installed Helm package manager version v3.11.3 or greater
- You have kubectl installed and connected to your kubernetes cluster
- A domain name for ingress configuration
- A GitHub organization where you’ll install the GitHub App
1
Create Helm values
Create a
values.yaml file. This will be used to configure settings for the Digger Helm chart.
To explore all configurable properties for your values file, visit the values.yaml reference.2
Select Digger version
By default, the Digger version set in your helm chart will likely be outdated.
Choose the latest Digger docker image tag from the releases page.
values.yaml
3
Configure database
Choose your database configuration based on your environment:
- External PostgreSQL (Production)
- Built-in PostgreSQL (Testing Only)
For production environments, use an external PostgreSQL database:
values.yaml
4
Configure ingress
Configure ingress to route traffic to Digger (required for GitHub App setup):
values.yaml
5
Configure initial secrets
Configure the authentication and hostname settings:
values.yaml
Hostname configuration is different from ingress:
- Ingress host:
digger.example.com(no protocol) - Secret hostname:
https://digger.example.com(requires https:// prefix)
- If your ingress host is
digger.35.232.52.175.nip.io - Your secret hostname should be
https://digger.35.232.52.175.nip.io
6
Install the Helm chart
Once you are done configuring your Wait for all pods to reach a running state:
values.yaml file, run the command below to install Digger:7
Create GitHub App
Navigate to your Digger hostname to create the GitHub App:
-
Go to
https://your-digger-hostname/github/setup - Follow the web interface to create your GitHub App
-
The page will display your app credentials
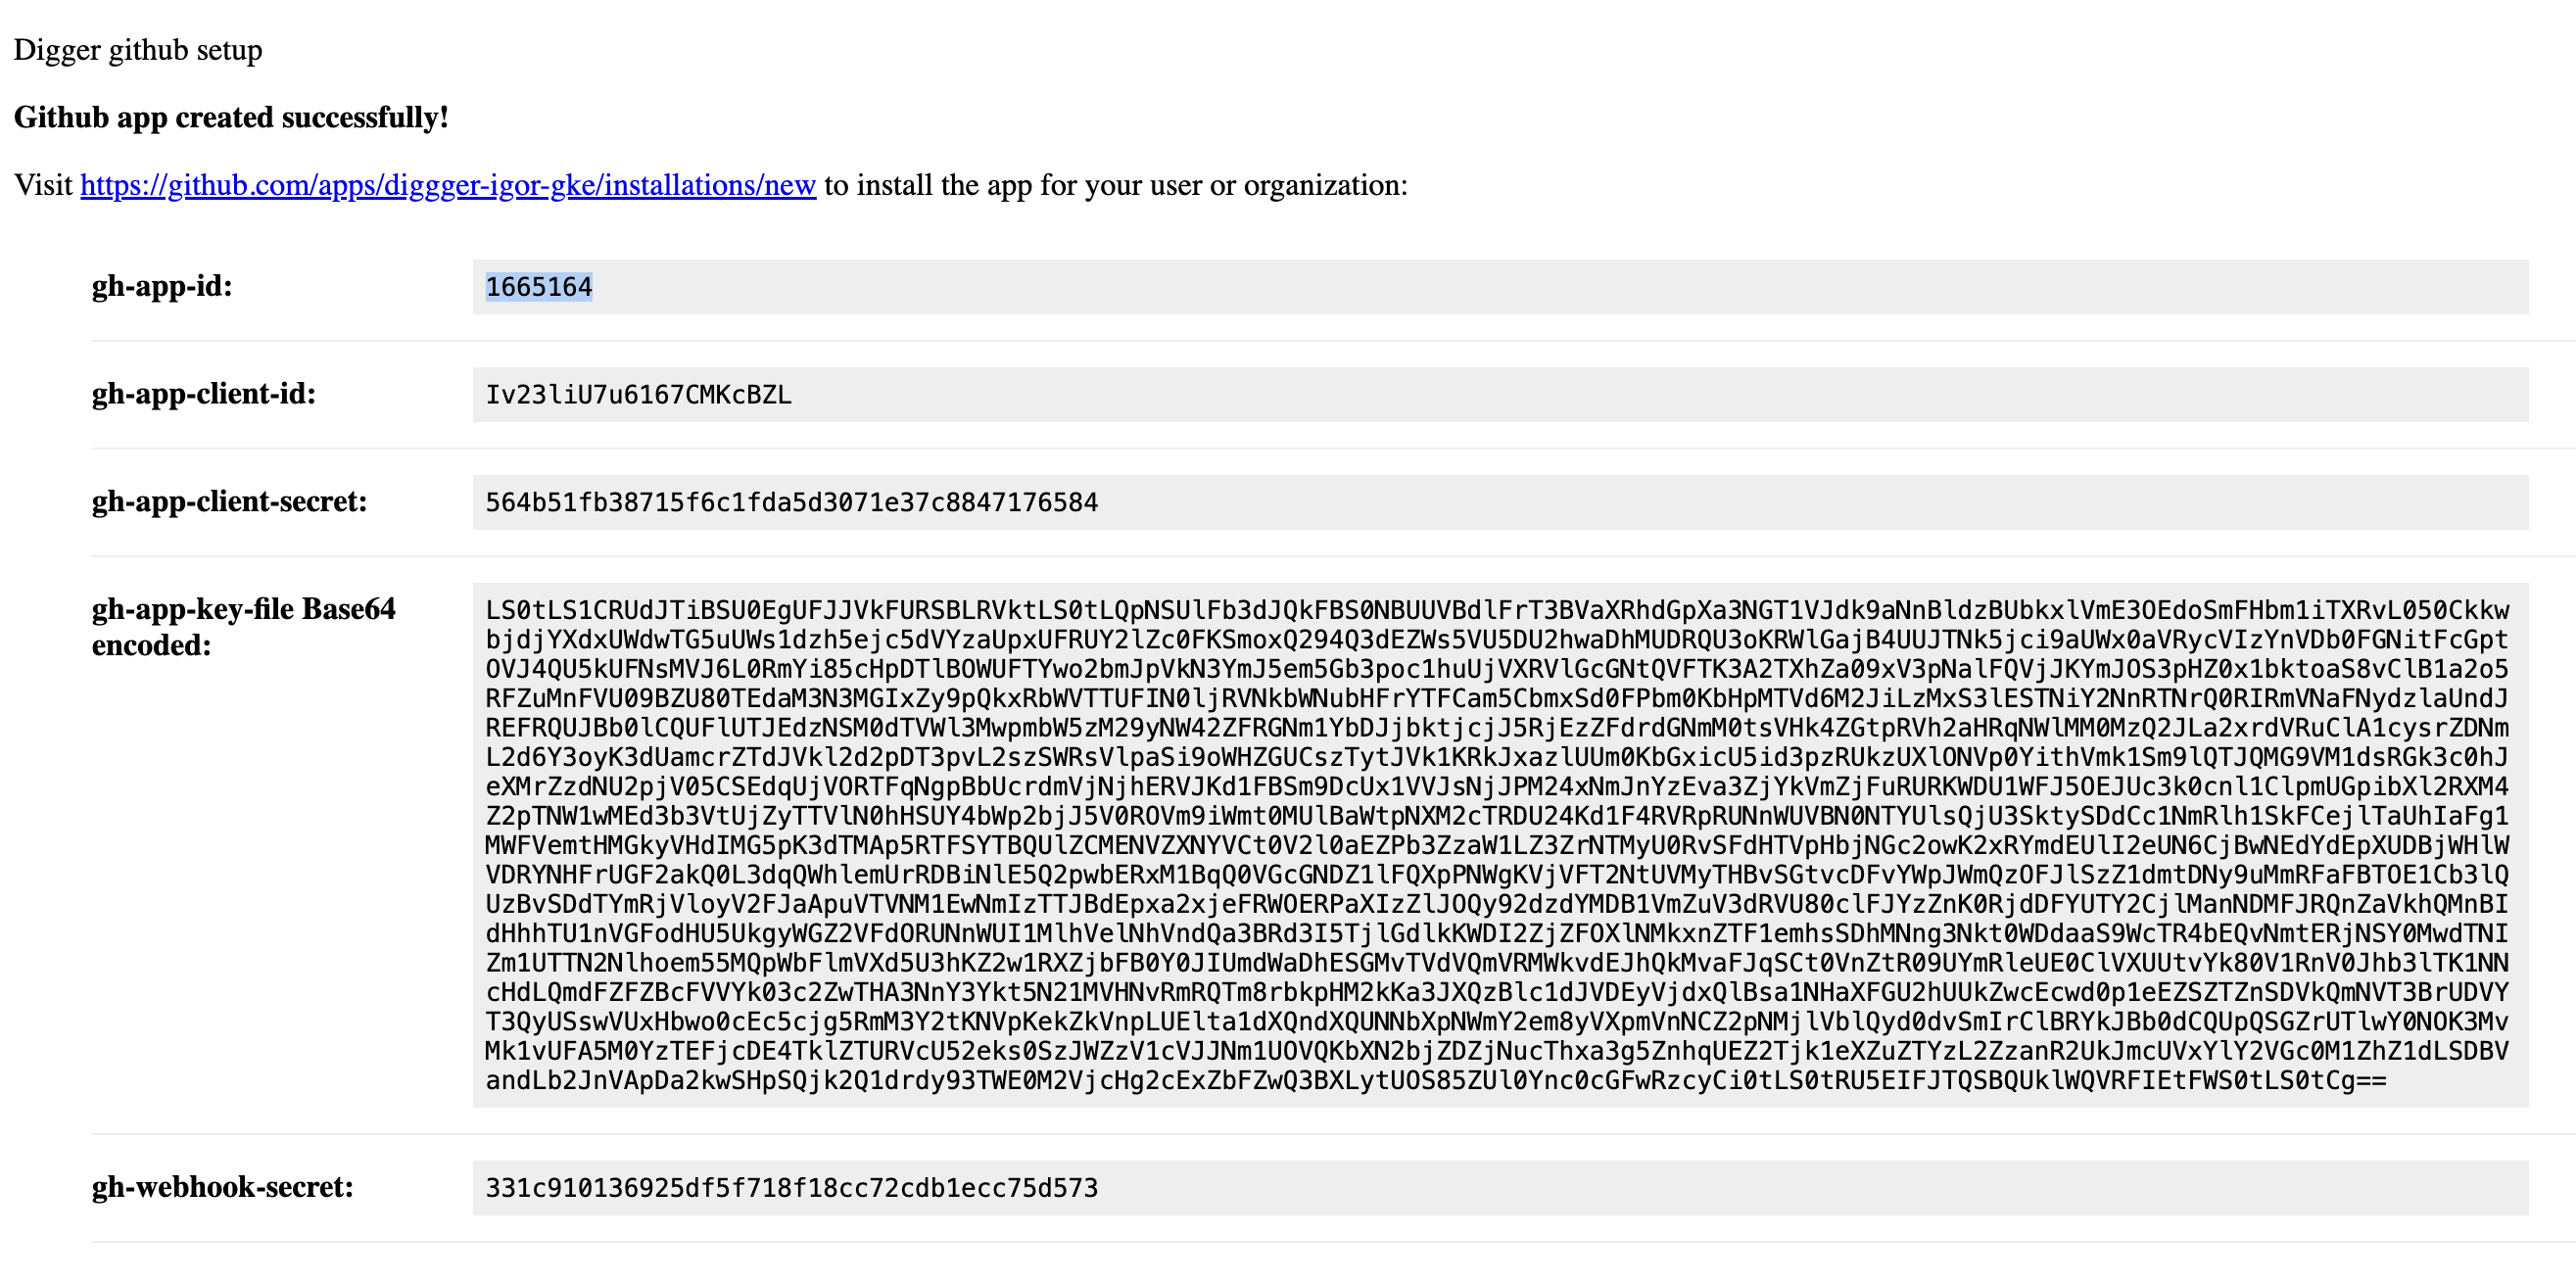
Don’t close this tab yet! You’ll need these credentials in the next steps.
8
Update configuration with GitHub App credentials
Add the GitHub App credentials to your Then upgrade the Helm release:
values.yaml file:values.yaml
9
Install GitHub App
Click the installation link shown in the GitHub App creation wizard:
- The link will look like:
https://github.com/apps/your-digger-app-name/installations/new - Install the app in your GitHub organization
- Select which repositories the app can access
10
Create Action Secrets with cloud credentials
In GitHub repository settings, go to Secrets and Variables - Actions. Create the following secrets:
- AWS
- GCP
- Azure
AWS_ACCESS_KEY_IDAWS_SECRET_ACCESS_KEY
11
Create digger.yml
This file contains Digger configuration and needs to be placed at the root level of your repository:
- Terraform / OpenTofu
- Terragrunt Generated
Assuming your terraform code is in the
prod directory:12
Create Github Actions workflow file
Place it at
.github/workflows/digger_workflow.yml (name is important!)- AWS
- GCP
- Azure
The workflow above uses Terraform. For other tools:
- OpenTofu: Replace
setup-terraform: truewithsetup-opentofu: trueandterraform-version: 1.5.5withopentofu-version: 1.10.3 - Terragrunt: Replace
setup-terraform: truewithsetup-terragrunt: trueandterraform-version: 1.5.5withterragrunt-version: 0.44.1
13
Verify installation
Test that your Digger installation is working correctly: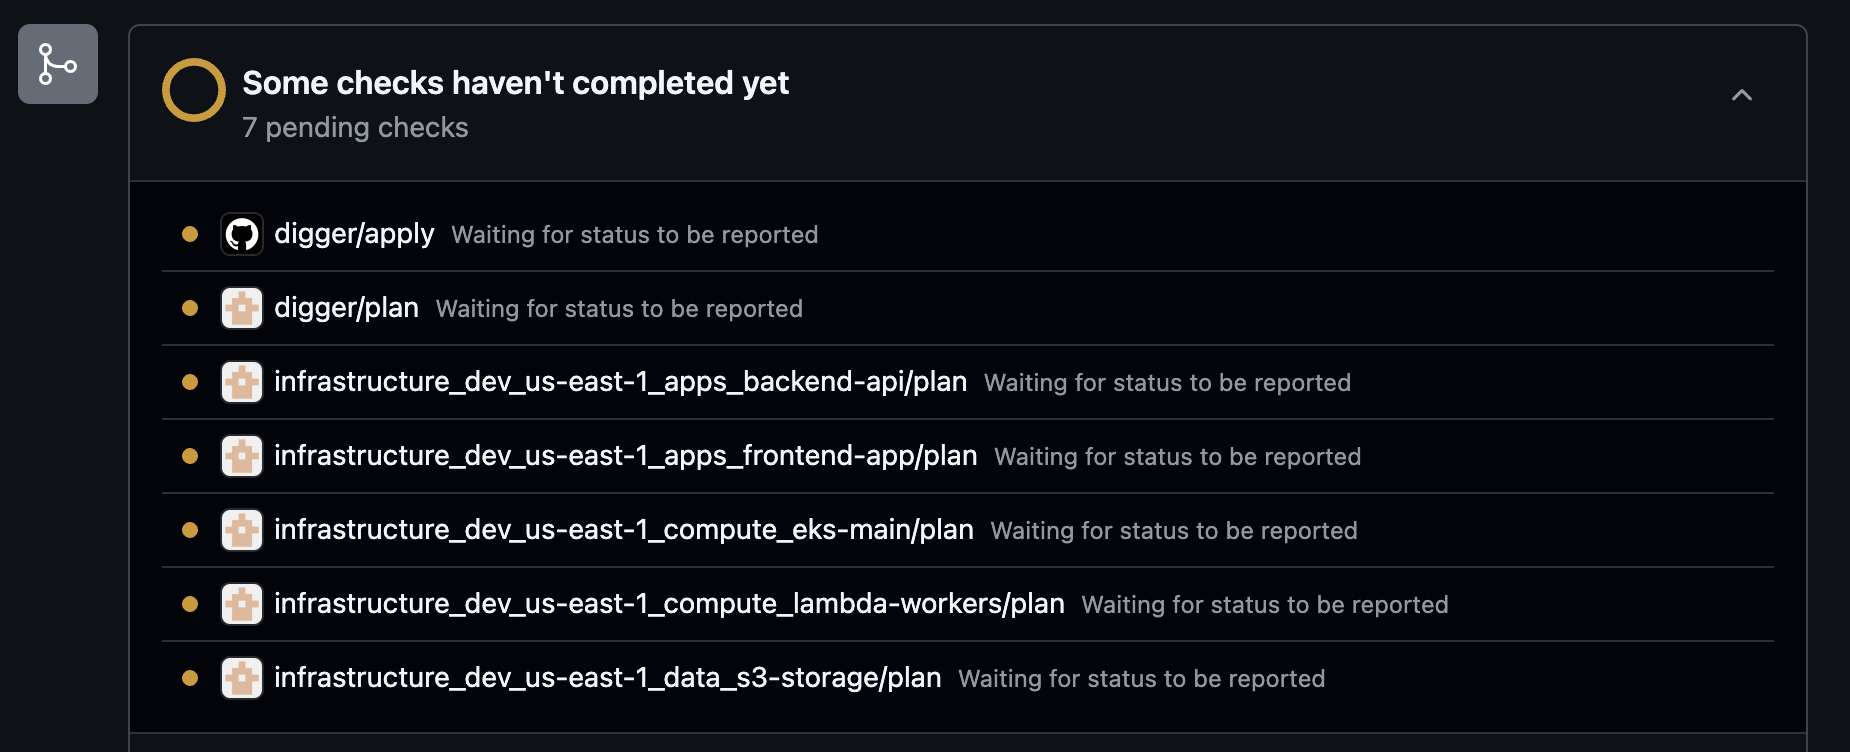
- Create a test pull request in one of your repositories with Terraform/OpenTofu files
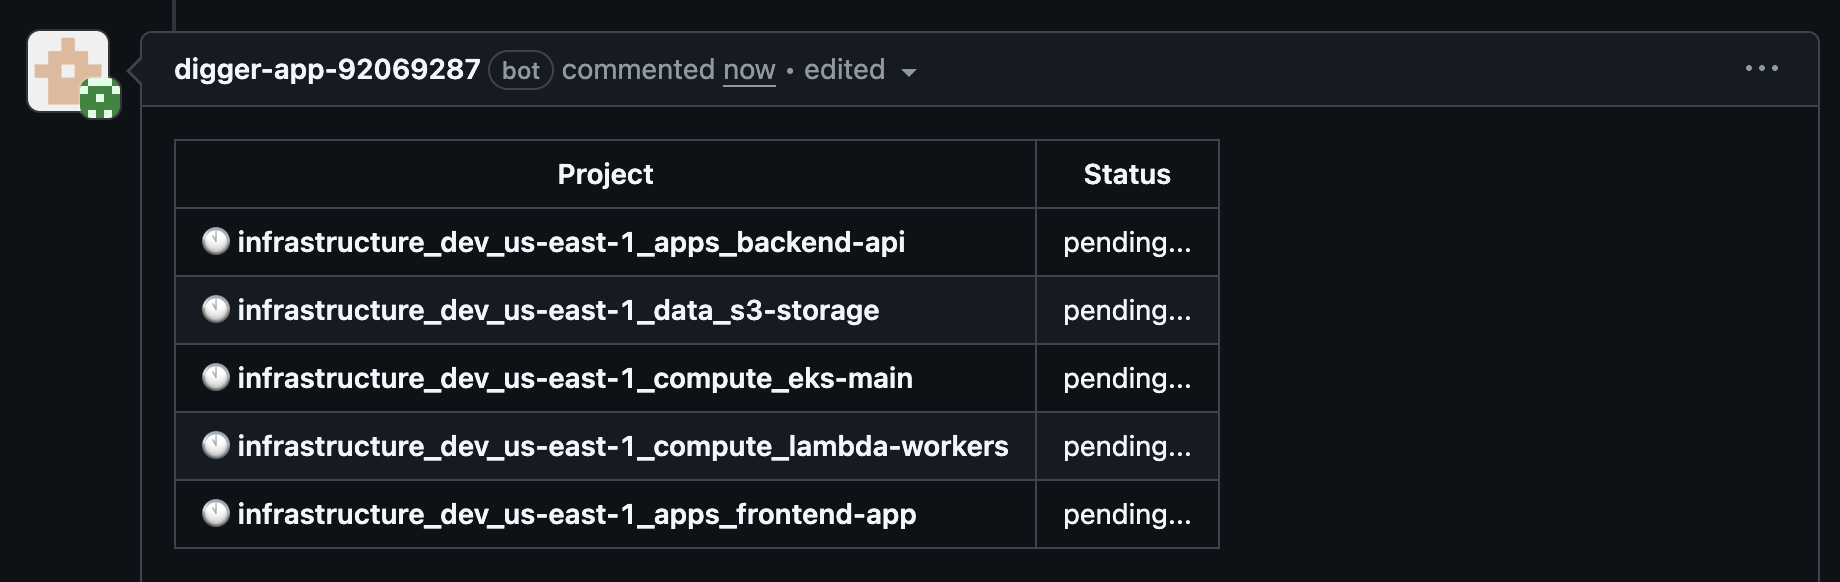
- Digger will automatically start planning - You should immediately see:
What you should see:
- GitHub checks appear as “pending” while jobs are running
- Digger bot comments with a table showing each affected project
- Project status updates from “pending…” to completion status
digger plan on the pull request.If you don’t see these responses, check the troubleshooting section below.Troubleshooting
Failed to validate installation_id error
Failed to validate installation_id error
If you see “Failed to validate installation_id” after GitHub App installation:
-
Check GitHub App credentials in your values.yaml:
-
Verify environment variables are set in the pod:
-
Restart the deployment to pick up new environment variables:
No response after creating pull request
No response after creating pull request
If Digger doesn’t respond when you create a pull request:
-
Check backend logs for errors:
-
Verify webhook deliveries in GitHub:
- Go to your GitHub App settings:
https://github.com/settings/apps/your-app-name - Click on “Advanced” tab
- Check “Recent Deliveries” for failed webhook attempts
- Look for 4xx/5xx HTTP status codes or connection timeouts
- Go to your GitHub App settings:
-
Common webhook issues:
- Ensure your hostname is accessible from GitHub
- Check that your ingress is properly configured
- Verify SSL certificates are valid
Invalid URL error when creating GitHub App
Invalid URL error when creating GitHub App
If you get an “Invalid URL” error when creating the GitHub App from manifest:
-
Check URL format in your values.yaml:
-
Restart deployment after fixing URLs: